DIY Face Mask Cover will give you the easy steps to follow to make one or more covers for yourself or to give them to your family members.
This is an easy sewing project any sewer will love to make, all you need is to find a pretty piece of fabric and it will be made in less than 15 minutes.
When doctors and the government are advising to ware double mask to get better protection, sewers know it’s time to sit down and start sewing!
DIY Face Mask Cover
Materials and Sewing Supplies
- 2 pieces of cotton 100% fabric in any color and print of —–
- 1 piece of paper A4 (paper used for printers)
- 2 pieces of fabric of ——
- Pen or pencil
- Ruler
- Scissors for fabric (affiliate)
- Scissors for paper (affiliate)
- Pins (affiliate)
- Sewing Machine (affiliate)
*This post shares affiliate links, thank so much for your support to our blog.
DIY Face Mask Cover – Step by step
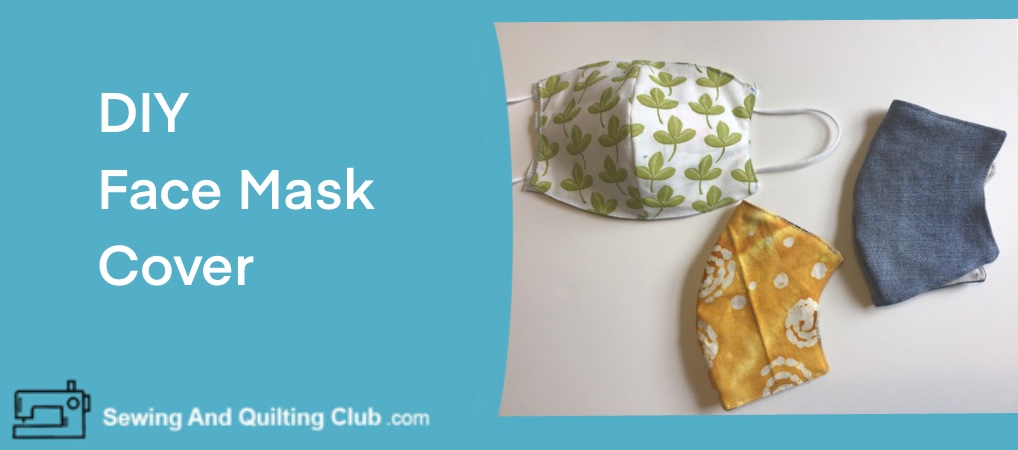
For the DIY Face Mask Cover I will use two pieces of cotton % fabric, but you can use any other type of fabric to make it, on the last image you can take a look at two more face mask covers I did, one is with recycled denim from a pair of old jeans, in one side and for the back I use a piece of cotton from the piece I cut from the legs from a pair of pants. The third mask cover I used a basic cotton fabric.
Step 1 – Draw Your Own Pattern
Take one of the face mask you have at home and fold it the middle and open the folds to have the full shape of it, Lay the folded mask on the paper and trace all around the mask with a pencil or a pen.

With the pen or the pencil add all around 1/4 inch for the seam.
Cut out the paper template with the help of a pair for scissors for cutting paper only.

Step 2 – Cut Out 4 Pieces Of Fabric
Fold the two pieces of fabric (right side to right side) and lay them on your work table and lay over the fabrics the paper template, pin the paper template to the fabrics.

With a good pair of scissors for fabric, cut out the 4 pieces.

Step 3 – Stitch On
Set up each pair of pieces of fabric, right side to right side and stitch on with straight stitching (3mm) the big curved side, on both pieces.
Clip the curved seam, open the seam on each piece.
Some tutorials will tell you to top stitching the seam, I don’t do this step as it said, less stitching on the fabric face mask will provide more protection.

On the image below, you can see how both pieces look like when the curved seam is stitched, on the left the floral piece shows the right side, on the right you can take a look how the seam is clipped and open.

Step 4 – Stitch On The Two Fabric Pieces
To hold the face mask inside the cover you will need to sew two pieces of fabric, on each piece fold twice 1/4 inch on both sides and stitch on.

Step 5 – Stitch On Both Pieces To The Face Mask Cover
Take the piece of the same fabric as the two pieces and lay over the piece the two pieces, pin the two pieces to the face mask cover, right side up on all the pieces.

Stitch on the edge of the face mask cover piece and trim out the 4 ends of the two pieces of fabric.
Remove all pins.

Step 6 – Stitch On The Face Mask Cover
Lay on the face mask cover piece without the two pieces of fabric over the piece with the two pieces of fabric, right side to right side, pin it.
Stitch on all around, 1/4 inch seam, don’t forget to leave a gap open to turn the piece out. Clip the seam all around and turn the piece out.

This is how the face mask cover will look like when it’s turned out, you can see where I left the gap open.
Tuck in the seams where the gap is, and pin it.

Step 7 – Top Stitching All Around
Top stitching all around the edge of the face mask cover.

The Face Mask Cover is finished and it’s ready to be used, all you need is to put a face mask inside the two strips and it’s ready to be used.

On the image below, this is how the face mask cover will look like on the front.

You can make the face mask cover in different types of fabrics, color and prints to have a few them to match them with your outfit, but also this will help you to know which one is already used and needs to be washed.

As doctors and government are advising to use double face mask to get more protection, handmade covers will help you to use double protection without the need to have double elastic on your ears, and you can make them with your favorite fabrics!

When you love to sew, you can make many things to improve your lifestyle, and today you can sew the face mask covers for yourself and for everyone in your family.
How To Wash The Face Mask Covers?
When you use cotton fabric to make the covers, you can put them in a regular cycle on your laundry machine, but you can also put them in a laundry bag, you can put them or not in the dryer.
What Sewing Machine Is Best For Making Face Mask Covers?
At home I have a Brother Computerized Sewing Machine, I used it with straight stitching (3mm) with the multipurpose presser foot to make the three covers on the image above, when I was working on the two made with cotton fabric, everything went well.
At the time to work on the cover made with denim, I could notice I had to slow the speed at the time to do the top stitching as it has multiple layers of fabric in the seam, if you’re planning to make many sewing projects with denim or other type of fabric, I will recommend buying a Sewing Machine Heavy Duty.
Is The DIY Face Mask Cover A Sewing Project Good For Beginners?
This is a sewing project easy to make and it will help any beginner to learn more about sewing, this project can be made with any fabric, and easy steps to follow, for that reason this is the project any beginner will love to make.
DIY Face Mask Cover – Final Thoughts
When you love to sew, you can make easy sewing projects to help yourself and your family members to have the best protection for these difficult times.
When the government and doctors tell you to ware double mask for better protection, being a sewer can help the day!
This tutorial is an easy sewing project to make that doesn’t take long to finish, you can make a few of them in one morning or in the afternoon and make a few of them for yourself and some more to give them as a gift to your family members or to your best friends or to anyone who needs them.
We hope you like this sewing tutorial, we are sure you’ll be making more than one.
You can also read:
- Easy DIY Face Mask With Filter – Easy steps to follow to sew a face mask with filter.
- Face Mask Storage Bag Tutorial – Keep all the face mask in a place and ready to take one anytime you need to go out.
Thanks so much for sharing our PIN!

Hello there! I just finished reading your article about making your own face mask coverings. This is a great little article and I just wanted to say thanks for sharing such detailed information. I have recently got into sewing and have dusted off my old sewing machine, which could do with a bit of an update! I really appreciate you also sharing your advice on the best machines for this kind of job. I really do need a new one, so I will be checking out the Brother one that you mentioned.
Thanks again!